Permanent DIY Christmas Lights: Your Hassle-Free Holiday Hack
Picture this: it’s the first week of December, and while your neighbors are wrestling with tangled light strings and broken clips, you’re inside sipping hot cocoa. A simple flip of a switch, and your house transforms into a holiday masterpiece. That’s the magic of permanent Christmas lights, and with ShawTech Lighting, you can make this dream your reality.
Gone are the days of dreading that annual climb up the ladder with frozen fingers and a growing pile of frustration. Permanent DIY Christmas lighting systems have changed the game entirely.
Why Permanent Christmas Lights Make Perfect Sense
Let’s talk about the elephant in the room—nobody actually enjoys the traditional Christmas light routine. The untangling, the testing, the inevitable discovery that half your lights died in storage.
Permanent lighting systems eliminate this entire headache. Install once, enjoy for years. The lights stay put through every season, protected and ready to illuminate your home at a moment’s notice.
These systems are built to withstand harsh weather conditions year-round with UV-resistant materials, waterproof connections, and LED technology that maintains its brilliance through scorching summers and freezing winters.
The Financial Logic Behind Going Permanent
Here’s where the math gets interesting. Most homeowners spend $150-300 annually on temporary Christmas lights, clips, extension cords, and replacement bulbs. Over five years, that’s $750-1500 just to recreate the same display repeatedly.
Permanent systems require a higher upfront investment but eliminate ongoing costs. Quality DIY permanent Christmas lights kits pay for themselves within 2-3 years, then provide pure savings for decades.
Choosing Between Channel and Non-Channel Systems
The biggest decision you’ll face is whether to go with a channel-based system or a more flexible approach. Both have their merits, and your choice depends on your home’s architecture and aesthetic preferences.
Kits with channels offer the most professional appearance and maximum weather protection. The channels create clean, straight lines along your roofline while hiding the actual LED strips from view. They’re particularly effective on homes with prominent trim or architectural details you want to highlight.
Channel systems also make maintenance easier. If you need to replace a section or make adjustments, the channels protect your investment while providing easy access to the lights themselves.
For homes where flexibility matters more than ultra-clean lines, DIY permanent Christmas lighting kits without channels provide more installation options. These systems work well for curved surfaces, irregular rooflines, or situations where you want lights to follow more organic patterns.
Installation Planning That Prevents Problems
Successful permanent lighting starts with thorough planning. Walk your property during different times of day, noting how shadows fall and which areas will be most visible to neighbors and passersby.
Measure twice, order once. Permanent installations don’t forgive measurement errors easily, so be precise about your footage requirements. Don’t forget to account for corners, connections, and any obstacles that might require additional length.
Consider your control options early in the planning process. While basic on/off switches work, smart controllers transform your lighting from simple decoration to dynamic entertainment. Indoor LED controller kits let you manage complex displays from your smartphone, creating different moods throughout the holiday season.
Step-by-Step Installation Strategy
Start with the most challenging areas first—typically your main roofline. This establishes your primary lighting framework and helps you gauge spacing and brightness levels for the rest of your installation.
Safety remains paramount. Use proper ladders, work with a spotter, and avoid installation during windy or wet conditions. Permanent systems require more precision during installation since corrections can be more involved than temporary setups.
Take your time with mounting hardware. Permanent installations need secure attachment points that won’t fail over time. Use appropriate fasteners for your home’s construction—masonry anchors for brick, appropriate screws for wood, and specialized clips for vinyl siding.
Test everything before final installation. Run your entire system through a complete cycle to ensure all connections work properly and brightness levels meet your expectations.
Advanced Features Worth Considering
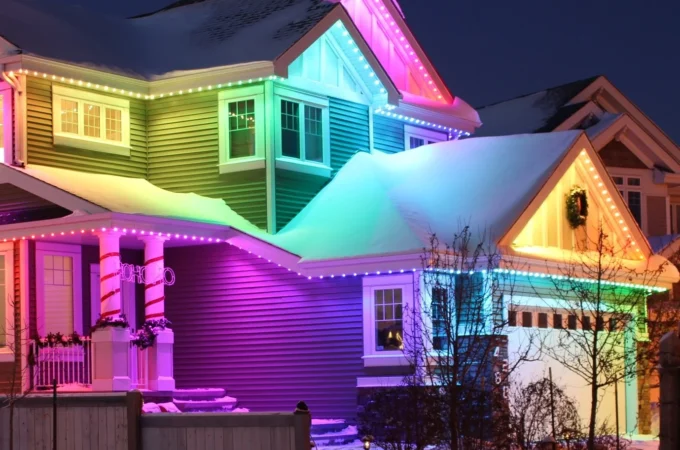
Modern permanent lighting systems offer capabilities that were unimaginable just a few years ago. Color-changing LEDs let you customize your display for different holidays, seasons, or even special events.
Programmable controllers can create subtle animations, fade effects, or synchronized patterns that make your home the neighborhood showpiece. Timer functions eliminate the need to remember daily on/off routines.
Maintenance and Longevity Tips
The beauty of permanent systems lies in their low maintenance requirements. Annual inspections should check for loose connections, weather damage, or any sections that might need attention.
LED technology means bulb replacement becomes virtually eliminated. Quality LEDs last 25,000-50,000 hours—that’s potentially 20+ years of holiday lighting with typical usage patterns.
Clean your lights annually with a soft brush or compressed air to remove dust and debris. This simple maintenance keeps them looking their best and prevents any buildup that might affect performance.
Seasonal Versatility Beyond Christmas
Here’s a bonus most people don’t consider—permanent lighting systems work for more than just Christmas. Independence Day, Halloween, Valentine’s Day, or any celebration becomes an opportunity to create custom lighting displays.
Warm white LEDs provide elegant accent lighting for outdoor entertaining throughout the year. Some homeowners use their permanent systems as security lighting, providing subtle illumination that enhances safety while maintaining curb appeal.
Common Mistakes to Avoid
The biggest error is underestimating your power requirements. Calculate your total wattage needs and ensure your electrical system can handle the load. Permanent systems often use more lights than temporary setups, so adequate power supply becomes crucial.
Don’t skimp on weather protection. While permanent systems are built to last, proper installation of weatherproof connections ensures years of trouble-free operation.
Avoid the temptation to over-illuminate. More isn’t always better—strategic placement of quality lights creates more impact than randomly scattered bright spots.
Making the Investment Decision
Permanent DIY Christmas lighting represents a shift from annual expense to long-term investment. The initial cost might seem substantial, but the convenience, reliability, and eventual cost savings make it one of the smartest home improvements you can make.
Consider starting with your main roofline and expanding over time. This approach spreads the investment while letting you experience the benefits immediately.
Your future self will thank you every December when you’re relaxing inside while neighbors battle with ladder and lights. That’s the true value of permanent Christmas lighting—transforming a seasonal chore into effortless holiday magic that enhances your home’s beauty year after year.
Anthony M. Salvatori is President of Steadfast Painting Solutions. He has 20 years of painting experience and has been operating his own company for nine years. Salvatori is proud to be leading such an incredible team of individuals with the common goal of providing excellent service and quality.