Concrete Leak Repair Methods: Practical Solutions for a Dry Basement
What Causes Concrete Basement Leaks?
The story of nearly every leaky basement starts outside the home, with forces of nature and time at play. Water is relentless, especially as the seasons shift. When rainwater or melting snow saturates the soil around a foundation, it puts extra pressure on basement walls. Over time, even the smallest cracks in concrete can widen, providing a pathway for water to seep inside. Poor drainage, downspouts aimed too close to the house, and improper landscaping only accelerate the process, creating situations where leaks aren’t just possible—they’re almost guaranteed. While temporary fixes abound, for many, a permanent basement leak repair is the most effective long-term strategy to safeguard both the home’s structure and its air quality.
Experts highlight that as many as 60% of homes with basements will experience some form of water penetration over their lifetime, as noted by the International Association of Certified Home Inspectors. Settling soil, freeze-thaw cycles, and small construction oversights compound these odds.
How to Spot Signs of Water Intrusion
Unlike more obvious household disruptions, basement leaks can sneak up subtly. The key to avoiding costly damage is recognizing the early warning signs. Circling water stains on concrete floors or creeping up the walls are often the first giveaways. Efflorescence (a salty, white powder) forms when water evaporates and leaves minerals behind on surfaces.
A musty or earthy smell drifting from below ground is another red flag that should never be ignored. Over time, chronic dampness warps wooden moldings and rusts nails or support beams. Some homeowners discover warped cardboard boxes, soggy stored goods, or mold growing on books left unattended in the basement. These seemingly minor problems can quickly escalate if not addressed, leading to major repairs or health concerns related to mold and mildew exposure. Staying alert and routinely checking corners, behind stored items, and beneath rugs or furniture can make a world of difference.
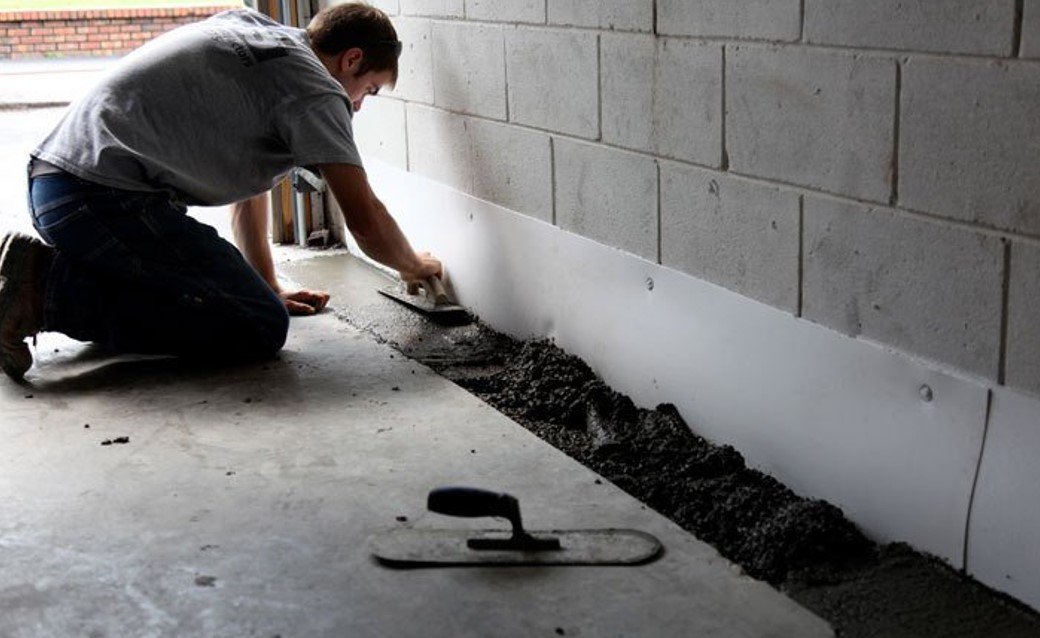
Common Repair Methods for Concrete Leaks
Once water finds its way indoors, the first question is how to prevent it from happening again, preferably for good. Each repair option comes with its advantages and trade-offs. One popular method for tight, manageable cracks is the injection of epoxy or polyurethane. These compounds are designed to expand when injected, completely sealing fissures at their source and preventing moisture from entering.
In cases where leakage is widespread or stems from external pressures, exterior waterproofing is often the preferred solution. This process involves excavating the soil around the home’s foundation and applying a commercial-grade waterproof barrier directly to the outside of the basement walls. Although labor-intensive, it’s highly effective in areas prone to frequent groundwater intrusion.
Within homes, especially those located in areas prone to dampness and high humidity, homeowners often turn to waterproof paints or cementitious coatings as potential solutions. However, it’s important to note that these options are best suited as backup measures rather than primary solutions. They can provide an additional layer of protection against moisture but should not be relied on solely to keep basements dry.
Choosing Between DIY and Professional Repair
Not all leaks in your home require the intervention of a contractor bringing along a full crew. If you happen to spot a brand-new, fine crack in your walls or foundation and it hasn’t yet allowed much water in, you might find that using store-bought hydraulic cement or epoxy kits can offer you an accessible and effective fix. These products are often available at your local hardware store and can be a great option for homeowners. However, it’s essential to follow the instructions that come with these products carefully. Moreover, ensure that the area is truly dry and clean before you begin your repair; this is a crucial step for any DIY intervention. Taking the time to prepare properly can make a significant difference in the success of your project. For those willing to roll up their sleeves and take on the task, these minor interventions can be both satisfying and budget-saving, allowing you to take pride in your handiwork. However, when it comes to more complex issues—such as bowing walls, visible structural shifts, or multiple points of water entry—such serious problems should never be left to chance or handled lightly. In these cases, professional contractors possess the necessary tools and expertise to diagnose not only the visible symptoms but also the underlying causes of leakage. Experienced professionals often utilize advanced tools, such as infrared cameras, to assess moisture levels that manufacturers may have concealed, which may not be visible to the untrained eye. Furthermore, many reputable contractors back their work with transferable warranties, which can offer additional peace of mind for homeowners concerned about ongoing issues.
Investing in expert help may cost more upfront compared to a DIY approach. Still, for persistent or serious leaks, it’s an undeniably wise choice that not only preserves the value of your property but also provides invaluable peace of mind. Protecting your home from further damage is a crucial consideration; sometimes, the safest and most effective course of action is to seek professional assistance.
Step-by-Step: Basic DIY Concrete Leak Fix
Easy Basement Patch in Five Steps
- Locate and Repair the Leak: Identify the source of the issue. Widen hairline cracks gently with a cold chisel, if necessary, so that the repair material can penetrate. Sweep out debris, dust, and loose concrete.
- Prepare the Material: Use a patching compound, such as hydraulic cement or a formulated epoxy. Mix until the consistency matches the manufacturer’s guidelines. Quick-setting products help prevent more water from entering as you work.
- Apply and Seal: Force the material into the crack as deeply as possible, using a putty knife or trowel. Don’t rush—press the patch until air pockets disappear. Smooth the surface and feather the edges for a seamless seal.
- Let It Cure: Observe the curing instructions. Avoid letting the area get wet while the compound sets, as this could compromise the new barrier.
- Check for Success: After curing, inspect your handiwork. Pour a small amount of water near the repaired area on the exterior, if safe, or monitor it closely during the next rainstorm.
This process is quite straightforward and manageable, especially when dealing with a single crack or a small wet patch. For many homeowners and DIY enthusiasts, tackling minor issues themselves can be a comforting idea. When in doubt about the extent of the problem, starting with a small repair is often the most prudent approach. It enables you to assess the situation more accurately and determine whether the underlying issue exists without incurring unnecessary expenditures. By addressing smaller problems first, you can save time and resources in the long run, as it may prevent the escalation of more serious damage that could arise if left unattended.
Long-Term Strategies to Prevent Future Leaks
Repairing a leak is just one piece of basement maintenance. Keeping water out for good means preventing future problems before they start. Gutters are often overlooked, but clogged or leaky downspouts are a major source of water collection near basement walls. Cleaning them twice annually, or after major storms, is a must. In addition to maintaining gutters, review your landscaping—soil should consistently slope away from your foundation, dropping at least six inches over the first ten feet. Redirecting downspouts or adding extensions also helps keep standing water from gathering too close to the house.
Humidity control plays a crucial yet often overlooked role in maintaining a healthy and comfortable living environment. Dehumidifiers are invaluable tools that mitigate chronic dampness, effectively reducing the likelihood that moisture will persist long enough to cause significant damage. In regions prone to heavy rainfall, regularly testing sump pumps before each rainy season is essential to ensure they’re fully operational and ready when needed most. Additionally, if you live in an area that is vulnerable to power outages during storms or other emergencies, investing in a reliable battery backup for your sump pump can serve as an invaluable safeguard against unexpected flooding.
Coupling these proactive habits with Handyman’s visual inspections of your property can help keep small issues from escalating into big headaches down the line. Staying vigilant about potential moisture problems in your home can save you time, money, and stress in the future. By taking these steps, homeowners can enjoy peace of mind knowing they are effectively protecting their homes against the dangers of excess moisture.
Anna Fox is the Content Marketing Strategist at Arizona-based company that provides high pressure misting systems/fog effects, comfort heaters, patio drop shades, hvls fans and more. When not writing, she makes use of her spare time reading books and hiking with her dog, Blaze.